
My automatic chicken door has been up and running for four months now, and so far, knock on wood, it has been as faithful as a postman. It is built of scrap wood and Lucite and runs on the little Add-A-Motor D20 Chicken Coop Motor from Smarthome.com. In case you are contemplating a new door for your chicks, here's how I built it.
I used:
(2) 2x4 boards, 36 inches long
(2) 2x4 boards, 12 inches long
(1) sheet of PGLA .220 Lucite (a competitor of Plexiglas), 12"x18"
(1) strip of aluminum slatwall insert, 3' long
(1) screw hook, to attach the string to the door
(1) handful of nails
(1) Add-A-Motor D20 Chicken Coop Motor
(1) lamp timer
All that cost about $120, which was more than I wanted to spend, but after letting my birds in and out every day for 12 years, I decided it was worth the money. Of the total, about $20 went for construction materials, and the rest paid for the motor. In the time since I bought them, the materials have gone up in price and the motor has come down, but the bottom line is about the same.
Some doors are at ground level. Mine is elevated, with a ramp for access, and my chickens love it. I put rungs on the ramp at chicken footstep intervals, about 3 inches apart. The rungs are closer together than I expected them to be; I just kept adding until my birds stopped sliding.

My door was complicated by being framed inside an existing screen door. Your door, started from scratch, would be simpler to install. In either case, the design consists of three parts: the framed doorway, the sliding door itself, and the motor.
The doorway is 12" wide and 18" high, just big enough for my Rhode Island Red rooster Roy to get through if he ducks his head a little. You can check the best fit for your birds by putting ruler marks on a post or wall of your coop or leaning a yardstick against it and measuring your birds as they walk by.
The door is a Lucite panel that runs up and down in aluminum tracks. Lucite, Plexiglas, Masonite, and tin (not wood) are ideal materials because they are strong, lightweight, and waterproof and will slide without sticking. Up-and-down doors are more common than models that open from side to side and smaller doors are preferable to larger ones. Four pounds seems to be all a little motor can lift, and doors with shorter sides have less opportunity to bind against the frame.
The motor sits inside the coop and above the door frame. It works like a fishing reel, spinning first one way and then the other to raise and lower the door on a string. The lamp timer controls the schedule.
Aluminum slatwall inserts hold the Lucite in place and guide it up and down. They are tacked to the insides of the door frame and they look like this:
I used scrap wood to frame my doorway and bought the rest of my materials from Lowe’s Home Improvement Store. Lowe's sells the Lucite in 18” X 24” sheets and the aluminum slatwall inserts in 6’ strips. I had the store cut both in half for me, so what I took home was two 18” X12” panels of Lucite and two 3' strips of slatwall. If I had bought the wood there, I suppose they would have cut that, too. My timer is just a standard $4 lamp timer, also from Lowe's.
All I had to do when I got home was (using an existing entry into the chicken house):
I am particularly pleased with the bottom sill of the doorway. I grooved it to deter raccoons from poking their little claws underneath the closed door and trying to lift it.
I used the remaining half of my Lucite sheet to cover the top of the opening in my door. I tacked it tightly against the tracks as a permanent cover, but that was necessary only because I started with an opening that was twice as tall as I wanted in the first place. If you are starting from scratch, cut an opening exactly the size you need and be done with it. Share the extra Lucite with a friend.
Although the framing went well, the motor is a different story. I started with a motor that was too complicated for me and wasted quite a bit of time before I finally gave up on it and found a simpler one that I could install, adjust, and maintain by myself.
The first motor was the DIY model described on Chris and Keri's Blog. I liked it because it was inexpensive and hand-made and clever, but in retrospect, Oh My God, What was I thinking?! Chris and Keri's motor is a mass of electrical wiring and limit switches and a jerry-rigged screwdriver with a soldered circuit board that I don't even begin to understand. Look at Chris and Keri's material list carefully. If you don't recognize the parts or know what they're for or how they work, possibly this motor is not the best choice for you either, Grasshopper.
Master Po: Close your eyes. What do you hear?
Young Caine: I hear the water, I hear the birds.
Master Po: Do you hear your own heartbeat?
Caine: No.
Master Po: Do you hear the grasshopper which is at your feet?
Caine: Old man, how is it that you hear these things?
Master Po: Young man, how is it that you do not?
Pilot episode of Kung Fu (1972)
My friend Keith built Chris and Keri's motor for me; all I had to do was make it work. But I had immediate problems with the limit switches, which I never got the hang of, and after I had fiddled with the screwdriver for a while, it stopped working, too. The underlying problem was that I could not hear the grasshopper of the assembly which was at my feet. Although Chris and Keri's design is a boon to those with better ears, my destiny lay with a factory-built model and a warranty.
I got on the internet and bought the Add-a-Motor Chicken Coop Motor Model D20. On the negative side, it's made in China, it cost me almost $100 (although another company sells it cheaper now), and it’s not the hand-made gift my friend Keith made for me. On the positive, it arrived in 2 days, it’s small and manageable (it looks like a big white thermostat, with all the parts inside where I don't even have to see them), it has a warranty, and its optional accessories include attachments for battery and solar backup. What’s more, it came with simple, thorough, idiot-proof instructions that make me feel not actually competent, but still very warm and fuzzy indeed.
It took me the better part of a day to wire and install an electrical receptacle in the chicken house and it took all of the following morning for me to digest the instructions and install the motor, scrounge up a timer, set it, plug it in, and test it. But that night at 8:30 sharp, a gentle whir announced the door was closing, and the next morning my birds were outside and on the job before I was. The machine is a Godsend.
I used:
(2) 2x4 boards, 36 inches long
(2) 2x4 boards, 12 inches long
(1) sheet of PGLA .220 Lucite (a competitor of Plexiglas), 12"x18"
(1) strip of aluminum slatwall insert, 3' long
(1) screw hook, to attach the string to the door
(1) handful of nails
(1) Add-A-Motor D20 Chicken Coop Motor
(1) lamp timer
All that cost about $120, which was more than I wanted to spend, but after letting my birds in and out every day for 12 years, I decided it was worth the money. Of the total, about $20 went for construction materials, and the rest paid for the motor. In the time since I bought them, the materials have gone up in price and the motor has come down, but the bottom line is about the same.
Some doors are at ground level. Mine is elevated, with a ramp for access, and my chickens love it. I put rungs on the ramp at chicken footstep intervals, about 3 inches apart. The rungs are closer together than I expected them to be; I just kept adding until my birds stopped sliding.

My door was complicated by being framed inside an existing screen door. Your door, started from scratch, would be simpler to install. In either case, the design consists of three parts: the framed doorway, the sliding door itself, and the motor.
The doorway is 12" wide and 18" high, just big enough for my Rhode Island Red rooster Roy to get through if he ducks his head a little. You can check the best fit for your birds by putting ruler marks on a post or wall of your coop or leaning a yardstick against it and measuring your birds as they walk by.
 |
| Roy stands 24" from comb to claw. You can see the black mark on the post behind him. |
 |
| A string attaches the motor to the Plexiglas. |
The motor sits inside the coop and above the door frame. It works like a fishing reel, spinning first one way and then the other to raise and lower the door on a string. The lamp timer controls the schedule.
Aluminum slatwall inserts hold the Lucite in place and guide it up and down. They are tacked to the insides of the door frame and they look like this:
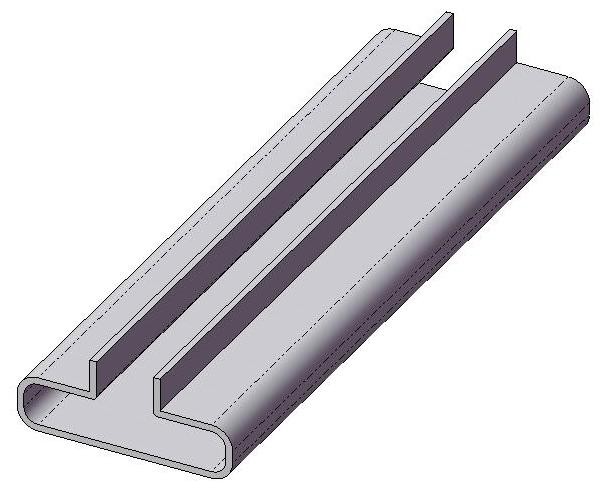 |
| Aluminum Slatwall Inserts guide the Plexiglas. |
I used scrap wood to frame my doorway and bought the rest of my materials from Lowe’s Home Improvement Store. Lowe's sells the Lucite in 18” X 24” sheets and the aluminum slatwall inserts in 6’ strips. I had the store cut both in half for me, so what I took home was two 18” X12” panels of Lucite and two 3' strips of slatwall. If I had bought the wood there, I suppose they would have cut that, too. My timer is just a standard $4 lamp timer, also from Lowe's.
All I had to do when I got home was (using an existing entry into the chicken house):
- Nail the aluminum slatwall to a wide edge of the longer 2x4s. The nail will go right through the metal; just be sure it is flush and straight and that you don't bend the metal;
- Nail one side board into place;
- Insert a Plexiglas panel into the track and the other side board, slide it up and down to make sure the fit is secure but not binding, and nail the second side board into place. Then, with the Plexiglas inserted, nail the bottom sill into place to hold it. And finally, nail the top board in place. It was very, very easy.
 |
| The closed door sits in a groove for added security. |
I used the remaining half of my Lucite sheet to cover the top of the opening in my door. I tacked it tightly against the tracks as a permanent cover, but that was necessary only because I started with an opening that was twice as tall as I wanted in the first place. If you are starting from scratch, cut an opening exactly the size you need and be done with it. Share the extra Lucite with a friend.
Although the framing went well, the motor is a different story. I started with a motor that was too complicated for me and wasted quite a bit of time before I finally gave up on it and found a simpler one that I could install, adjust, and maintain by myself.
The first motor was the DIY model described on Chris and Keri's Blog. I liked it because it was inexpensive and hand-made and clever, but in retrospect, Oh My God, What was I thinking?! Chris and Keri's motor is a mass of electrical wiring and limit switches and a jerry-rigged screwdriver with a soldered circuit board that I don't even begin to understand. Look at Chris and Keri's material list carefully. If you don't recognize the parts or know what they're for or how they work, possibly this motor is not the best choice for you either, Grasshopper.
Master Po: Close your eyes. What do you hear?
Young Caine: I hear the water, I hear the birds.
Master Po: Do you hear your own heartbeat?
Caine: No.
Master Po: Do you hear the grasshopper which is at your feet?
Caine: Old man, how is it that you hear these things?
Master Po: Young man, how is it that you do not?
Pilot episode of Kung Fu (1972)
My friend Keith built Chris and Keri's motor for me; all I had to do was make it work. But I had immediate problems with the limit switches, which I never got the hang of, and after I had fiddled with the screwdriver for a while, it stopped working, too. The underlying problem was that I could not hear the grasshopper of the assembly which was at my feet. Although Chris and Keri's design is a boon to those with better ears, my destiny lay with a factory-built model and a warranty.
 |
| Add-a-Motor Chicken Coop Motor Model D20 |
It took me the better part of a day to wire and install an electrical receptacle in the chicken house and it took all of the following morning for me to digest the instructions and install the motor, scrounge up a timer, set it, plug it in, and test it. But that night at 8:30 sharp, a gentle whir announced the door was closing, and the next morning my birds were outside and on the job before I was. The machine is a Godsend.
No comments:
Post a Comment